Challenge 6 - Reaction Timer
- Elvin Shoolbraid
- Apr 25, 2022
- 4 min read
Challenge Description:
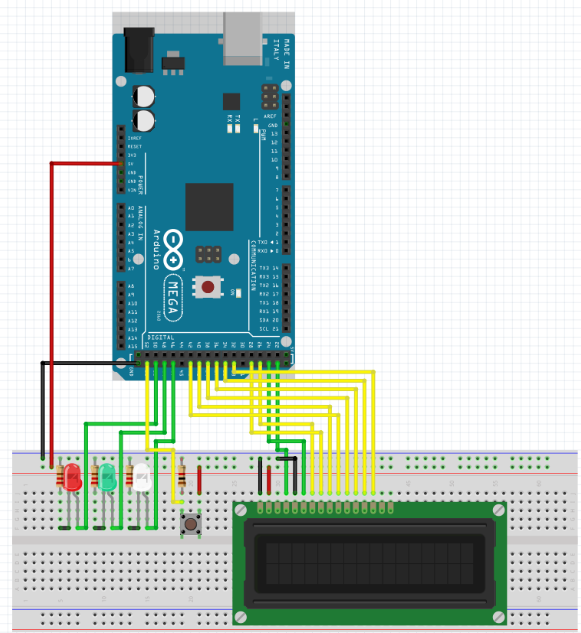
For this challenge, we needed to create a device to measure a person's reaction time. The device needed to turn a light on, and then measure the time it takes for the person to press a button in response. The device needs to display instructions to the player before beginning, and then compare the player’s reaction time to the average human reaction time of 215 milliseconds. If the player is faster, a green light will turn on. Otherwise, a red one will. The circuit must also have an enclosure. The instructions may be displayed through the serial terminal on the computer, but an extension we chose was to display the instructions on an in-built LCD display.
Schematic:

Code:
#include <LiquidCrystal.h> // include lcd library

int rs = 23; // initialize the LCD pin variables
int enable = 25;
int d0 = 27;
int d1 = 29;
int d2 = 41;
int d3 = 43;
int d4 = 39;
int d5 = 37;
int d6 = 35;
int d7 = 33;

LiquidCrystal lcd(rs, enable, d0, d1, d2, d3, d4, d5, d6, d7); //setup the liquid crystal pins

int waitTime; // initialize variables
int startTime;
int endTime;
int reactionTime;
bool buttonOn;
int tolerance = 215; // how slow you can be and still get green (ms)

const int buttonPin = 53; // initialize non LCD pin variables
const int greenPin = 49;
const int redPin = 51;
const int whitePin = 47;

int buttonRead() { // a function to read the buttons output and set buttonOn to true or false
  int buttonInput = digitalRead(buttonPin);
  if (buttonInput == 1) {
    buttonOn = true;
  } else {
    buttonOn = false;
  }
}

int reactionFunc() {

  while (waitTime < 0) { // wait for duration of waitTime, while checking if button has been pressed too early
    buttonRead();
    if (buttonOn) {
      reactionTime = -1;
      return (0); // exit function
    }
    waitTime ++; //add one to wait time
    delay(1);
  }

  startTime = millis(); //start the timer
  digitalWrite(whitePin, HIGH); // turn on the LED
  while (1) { // repeat until function exited
    buttonRead(); // read button
    if (buttonOn) { // when button pressed:
      endTime = millis(); // end timer
      reactionTime = endTime - startTime; // calculate reaction time
      digitalWrite(whitePin, LOW); // turn off light
      return (0); // exit function
    }
    delay(1);
  }
}

void setup() { // setup the pins
  pinMode(buttonPin, INPUT);
  pinMode(greenPin, OUTPUT);
  pinMode(redPin, OUTPUT);
  pinMode(whitePin, OUTPUT);
}

void loop() { // the main loops that calls all the functions
  buttonRead(); // check the button state

  randomSeed(analogRead(A0)); // make sure the random number is random with analog noise
  waitTime -= random(2000, 4000); // set wait time to random number between 2-4 seconds

  lcd.begin(16, 2); //begin transmitting to the LCD
  lcd.print("Press button to"); // write text to the screen
  lcd.setCursor(0, 1);// next line
  lcd.print("start!"); // finish text

  while (buttonOn != true) {// pause until button is pressed
    buttonRead();
    delay(1);
  }

  lcd.clear()// clear the LCD
  lcd.setCursor(0,0); // set cursor back to start
  lcd.print("Press button if");// write text to the screen
  lcd.setCursor(0, 1);// next line
  lcd.print("light turns on!");// finish text
  delay(1500); // wait 1.5 seconds

  reactionFunc(); //call the reaction timer function

  if (reactionTime < tolerance && reactionTime > 0 ) { // check if your reaction time is faster than average and if you weren't too early
    digitalWrite(greenPin, HIGH); // if so turn on the green LED
  } else {
    digitalWrite(redPin, HIGH); // if not turn on the red LED
  }

lcd.clear(); //clear the LCD
lcd.setCursor(0, 0);//set the cursor to the beginning

  if (reactionTime > 0) { // if you weren't too early write reaction time to LCD
    lcd.print("Your reaction");
    lcd.setCursor(0, 1);
    lcd.print("time is: ");
    lcd.print(reactionTime);
    lcd.print("ms");

  } else { // otherwise print "Too early!"
    lcd.print("Too early!");
  }

  delay(2000);//wait 2 seconds then turn off the lights
  digitalWrite(redPin, LOW);
  digitalWrite(greenPin, LOW);

  delay(2000); //wait 2 seconds and clear the lcd
  lcd.clear();

}
Video of Reaction Timer Working:
Reflection:
Partner 1:
What was the easiest part of this challenge?
The easiest part of this challenge was designing the box to hold it, we just had to use a website to get the general shape and joints, then add holes for the components in illustrator.
What was the most difficult?
The most difficult part of this challenge was getting the liquid crystal display to work, there were 14 individual pins we had to connect to the Arduino, as well as making sure that they all corresponded with the pin numbers in the code, plus making sure it doesn’t.
What did you learn in the process?
I learned how to load, align, and start the laser cutter in the woodshop. This will be very useful if I ever need to laser cut something again, which I most likely will.
Any goals for the next challenge?
To try not to make our lives hell with the wiring, and instead to be able to trust that nothing will break inside and just focus on the coding and debugging.
Partner 2:
What was the easiest part of this challenge?
Designing the enclosure was the easiest part of the challenge because all we had to do was use a website to generate the design. We just input the length, width and height, and the material thickness, and it created an SVG we could further edit in Illustrator to add ports and holes for the ports and components.
What was the most difficult?
Once again, in a similar fashion to challenge 4, wiring was the most difficult part of this challenge. For this challenge, we had to wire up 16 jumpers to the LCD screen, and hope none of them fell off when we crammed the overly stiff cables into the enclosure. The jumper wires and their slots have inconsistent friction, which means some of them are inevitably loose. This is fine until you try to move components around and mount them in a box, hoping that a wire doesn’t disconnect, forcing you to tear everything apart and probably rewire everything.
What did you learn in the process?
I learned that however good your enclosure design is, the simple nature of jumper wires can ruin everything. In future enclosure designs, I’ll take more care to minimize the movement of components and make sure not too much stress is on the wires.
Any goals for the next challenge?
To continue to outdo the requirements of the challenge, and also to make our lives easier in the wiring process.


Comments